


Astronomy Before the Telescope Observing Program Coordinator:Steve Boerner |
IntroductionIn a 2006 article in the Journal of the Royal Astronomical Society of Canada, Robert A. Egler aptly stated:
The early instruments were invented to answer important questions like when it would be time to plant crops for best success, when migrating herds might return, when seasonal flooding might occur, when religious days were to be held, what direction to go to get to a specific place, or where things in the sky were likely to appear. The instruments helped develop systems to measure both yearly cycles (calendar) and daily time (clock) as well as determine directions (compass). The ancient people who developed these instruments relied on what they could observe on the ground and in the sky with the Sun, the moon, and bright stars to point the way. |
 |
The purpose of the Astronomy Before the Telescope Observing Program is to provide an opportunity for you to examine some of the early instruments that provide information for both our daily lives and our astronomical observing.
Some of the activities you’ll do as part of this Program will seem more like survival skills or scouting activities, but for the ancients, survival skills were a daily necessity. Planting crops at the wrong time or heading in the wrong direction could have disastrous results. You’ll undoubtedly encounter an activity below that you’ve always wondered about. I think of the Revenge of the Nerds II movie scene where they were stranded on an island and needed to find north…the activity is included. You’ll see why sundials don’t tell clock time and be able to tell time at night without a clock. One of the culminating activities will be to construct your own personal Planisphere based on your own personal observations using historic instruments that were in use before Galileo turned his telescope to the stars.
Since this Program is based on astronomy before the invention of telescopes no optics will be used. You will be making naked-eye observations with homemade tools. Ancient astronomical sites requiring massive construction efforts can be found on six of the seven continents. You won’t have to construct gigantic structures like Jantar Mantar in India or Caracol in Belize but after you complete the program you may come to an understanding of what they were designed to measure. In fact, a good cloudy night activity would be to search for various historic structures built to measure the sky. A good starting place is http://solar-center.stanford.edu/AO/Ancient-Observatories.pdf. As part of the Program, you’ll be using internet search engines to find the tools needed to “solve” particular problems. The tools you will be making can, for the most part, be constructed with cardboard, cardstock or foam core using scissors, glue, rulers, protractors, drawing compass, and yardsticks. Some of the items need to be left outside and should probably be made from wood or protected. Nothing needs to be fancy or complex and nothing needs to be long lasting. However, be warned that you may enjoy the instrument to the point that you may wish to create something more lasting.
Each Observing Program has unique requirements. After reading this web page, and reviewing the Quick View of Requirements grid, if you have any questions about your equipment or how you plan to do your observations, please contact the Coordinator before you start observing.
Requirements and Rules
This certification is available to members of the Astronomical League, either through their local astronomical society or as members at large. If you are not a member and would like to become one, check with your local astronomical society, search for a local society on the Astronomical League Website (click here), or join as a Member-At-Large in the AL Store.
Participants must complete all of the activities and document their work in a journal. This program is a bit different than most Astronomical League Observing Programs. Include in your diary information on “this is how I did it”, “this is what my instrument looked like”, “this is how it worked”, “these are my findings”, and “how well did it work”.
Taking pictures at various points along the way to document your progress will help greatly and using a diary format with details as you work through the projects is encouraged. Some of the projects will only take minutes to complete while others will take months.
A Note About Modern Sextants: You might wonder why a modern sextant isn’t included in the instruments. Tycho Brahe died in 1601. The principle of the modern sextant was first implemented around 1731 and was found in an unpublished work of Newton (1643–1727). Modern sextants postdate our pre-1700 target time period and as such they aren’t explored here.
Required Activities:
1. Direction – Find true north without a compass: A number of the other activities will need true north so we’ll deal with finding directions first. As astronomers we have identified the North Star (Polaris), so make a sketch of finding north using the familiar constellations. This can be done using any of these techniques (Why not try them all?).
- Using the “Pointer Stars” at the end of the bowl of the Big Dipper (Ursa Major).
- Using the “cleaner” triangle of Cassiopeia.
- Go from the center of Orion’s Belt through his head (Meissa).
- Using the Summer Triangle by starting at Altair and moving through the open end of the triangle (closer to Deneb).
- The shadow (dip) method works well in the daytime and was the method used in the previously mentioned movie. Find true north and put down markers that you can refer to for future activities. The markers will help you locate the meridian for other activities below. Place a compass so that it can be seen with the markers and take a picture. Finally, measure the magnetic declination (difference between magnetic and true north) using your apparatus and your location. If you can, repeat the activity at a second location a few hours from where you live so you can see that location offsets really do matter.
2. Telling time – Sundials: Sundials are classified into a number of different types, mainly by the plane in which the dial lays…horizontal, vertical, equatorial, polar, etc. Some types are more challenging to make particularly those designed to be used at odd angles.
It is easy to go to the Internet and order a garden-type sundial. If you do and set it up, you’ll find that it doesn’t perform very well versus the clock on your kitchen wall. Sundials could tell time so accurately that they were used into the twentieth century.
Make at least three kinds of sundials, one of which is pocket-sized. You are encouraged to do the actual geometric construction of the dial rather than printing one that is already laid out. The sundials should be designed for your particular latitude and use corrections needed to tell accurate time by applying longitude, equation of time, and daylight savings time corrections. Test your sundials using your north marks and apply the needed corrections. Compare your results to a watch.
Construction of mechanical clocks is beyond the means of most of us, but they were in use during the later parts of the period this program covers. One such surviving clock is in Prague, Czech Republic. The clock was started in 1410 and should be viewed, if not in person at least via the Internet here: https://www.dailysabah.com/life/travel/a-legendary-clock-in-prague-600-years-of-history-and-fabled-tales. The information it provides beyond time is astounding.
3. Directions – Align a telescope during the daytime: You can “reverse engineer” the sundial process to find out at what clock time a shadow will point true north at your location on a particular day. Knowing this you can polar align an equatorial scope at local noon (which probably won’t be 12:00) using a shadow’s direction and a watch. This works particularly well for an observatory-mounted scope. You need to include your longitude and equation of time corrections and possibly one for daylight savings time to calculate the exact time for that day. In use, point your scope north then horizontally level your R.A. and Dec axis. Mount a small thin vertical piece on top of your OTA near the cover so it can cast a shadow. When the clock time hits your local noon, the shadow points north. Make a mark and it can be used to align your scope again in the future.
At what time at your normal observing site does an object cast a shadow due north on your birthday? If you have an equatorial mount you may wish to try this method of daytime alignment.
4. Time – Equation of time:
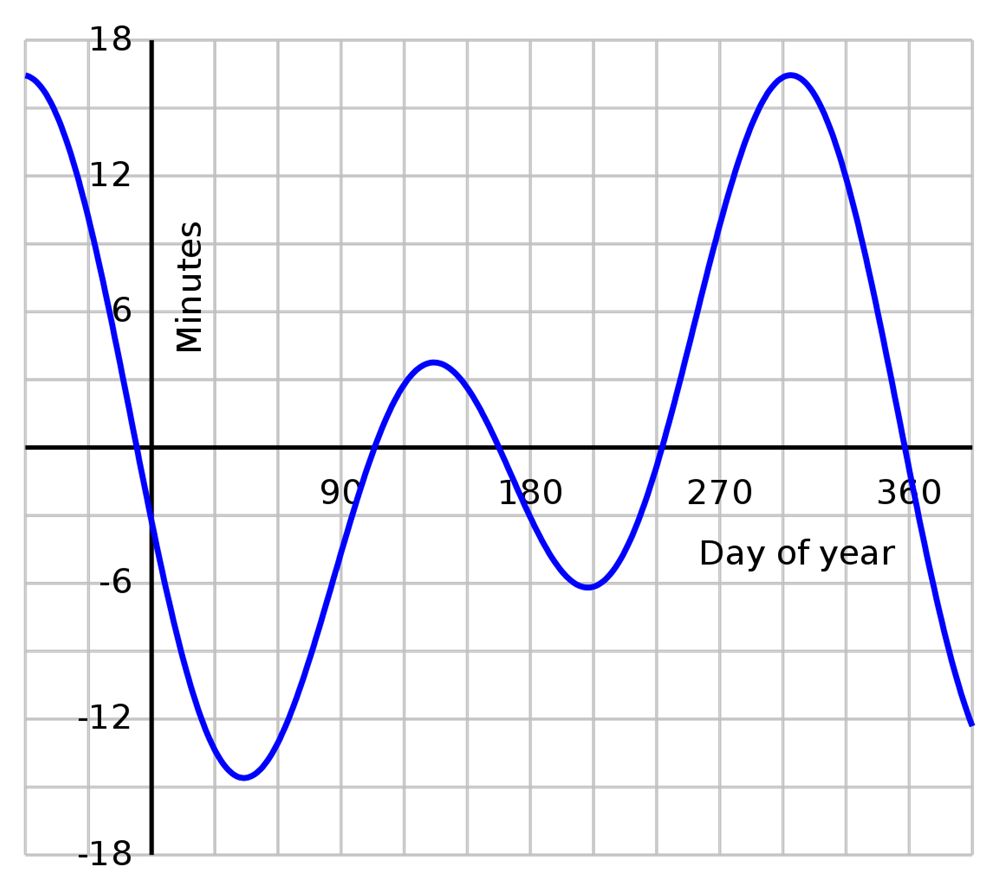 Two of the above activities have made use of the equation of time but how is it determined? It is one of the things done in the Astronomical League’s Analemma Program. To see how it is done find a telephone pole, street light, another tall straight object, projection on your house, or drive a pole into the ground. You just found a gnomon. Go out weekly for a month or two at exactly the same time of day (Standard Time) and note where the sun casts the shadow of the tip of your gnomon. If possible place a mark for reference so you can see all your points at once. You’ll find the shadow will move the most between observations if you are working in the spring or fall. Graph your results with days (x) and the shadow’s distance from your gnomon (y). Do it for a year and you will get a graph that resembles the picture. Consider following the better instructions on the Astronomical League’s Analemma page and completing the program there.
5. Telling time – Nocturnal: It isn’t nearly as easy to tell the time at night as it is in daylight. One early instrument was a nocturnal, an instrument used to determine the local time based on the relative positions of two or more stars in the night sky. The first nocturnals were described in the 12th century. Internet DIYs for nocturnals aren’t particularly easy to find so two possibilities can be found at:
- <https://www.instructables.com/id/2d-Nocturnal-Celestial-Stardial-TJT16/
- https://www.skyandtelescope.com/astronomy-resources/make-a-star-clock/
Make a simple nocturnal and try it out at least three times when you are observing. Make note of the nocturnal time and clock time. How well does it work?
6. Yearly Calendar Predictor:<
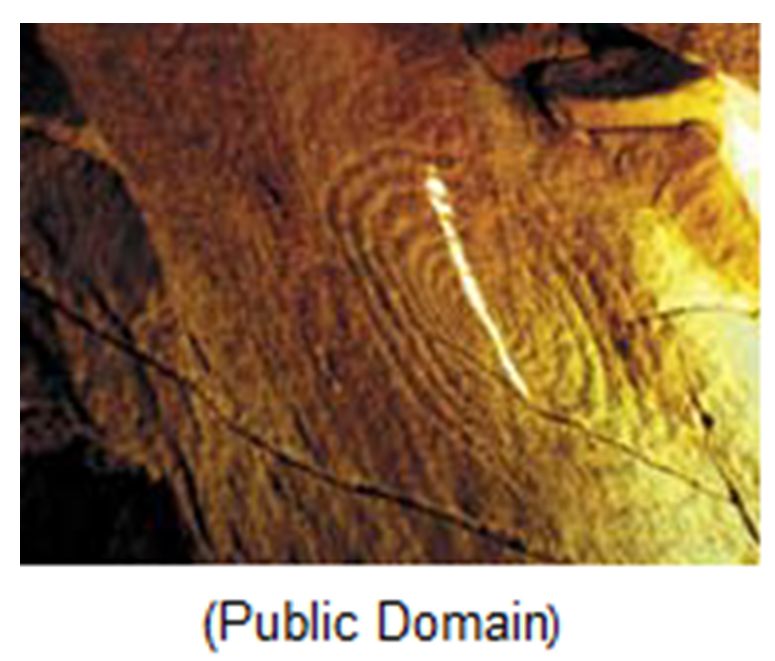 A trip to an ancient site like Chaco Canyon National Historic Park in New Mexico is a very rewarding experience. Scientists and Anthropologists have discovered the ancient inhabitants created predictors for the solstices and equinox by noting when the sun would rise or set behind features on the horizon. One of the most famous at Chaco Canyon is the Anasazi Sun Dagger. Chaco Canyon has other features like doors, windows, and hallways that align with the Sun at certain times during the year. Chaco Canyon isn’t unique. In Great Britain places like Stonehenge and Avebury, or Ireland’s Newgrange and Egypt’s pyramids and Nabta Playa show alignments with astronomical objects.
Your task is to find a place where you live where on the winter or summer solstice you can view the rising or setting Sun behind an object on the horizon (how might your astrolabe be able to help with this activity?). Take a picture that shows the event.
While it would take much too long for the benefit, the same method could be used to find the length of a year. Here you would count the number of days until the sun came up behind the object again. If you keep observing you’ll note that after a few years, your object won’t exactly be in front of the sun when it rises or sets. This is because a year is really more than 365 whole days long and a leap-year correction needs to be made. Ancient societies had centuries to work this out and develop their calendars. Investigate ancient calendar systems some night when you can’t get out to observe and nothing is on TV.
7. Measuring – Astrolabe:
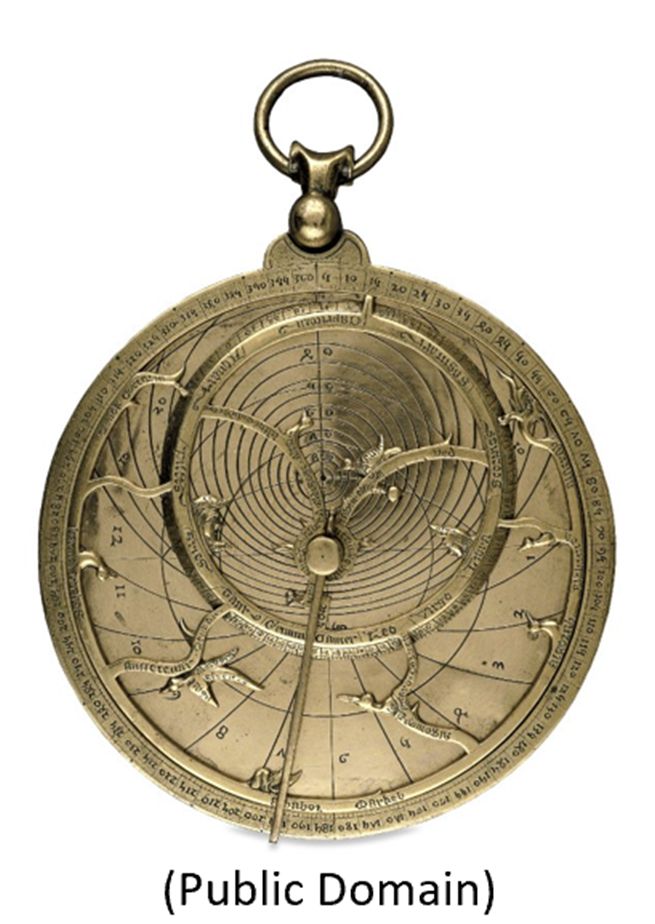
An astrolabe is an analog computing device that was invented over two thousand years ago. They were used to tell time, show directions, predict events, tell the length of a day, and so much more.
Construct an astrolabe using cardboard or plywood using directions you find on the Internet. You should be able to find printable pages that are designed for different latitudes, usually every five degrees. Using the one with the closest latitude to your location will be fine. If you get really interested you can find directions that can be used to customize one to your location or create one with the following link: http://www.astrolabeproject.com/the-astrolabe-generator/ If you are really brave, try to do the geometry to make your own. There are instructions for using your Astrolabe here.
On the pictured astrolabe, the tiny pointers represented important stars. The astrolabe you make probably won’t have them, so you’ll need to rely on the stars RA and Dec for activities below.
As a cloudy night activity use your astrolabe and for your birthday, the start of spring, summer, winter and fall:
-
- find the position of the sun on the ecliptic
- find the azimuth of the sun at sunrise and sunset
- find the time of sunrise and sunset
- find the sun’s altitude at transit
- find the length of daylight
- find the time that any five first or second-magnitude stars:
- rise and their azimuth
- transit and their altitude
- set and their azimuth
- find the length of time the star was in the sky
Use planetarium software like Stellarium, SkySafari, etc. to make the same predictions as done above. Finally, get out and actually see if any of the predictions are close to the actual event. How much difference do you see between the results that modern technology can produce versus that predicted by technology that is centuries old?
An astrolabe is also a measuring tool. Use your astrolabe to find:
- your latitude by measuring the altitude of Polaris
- the angular height of a tree (or mountain)
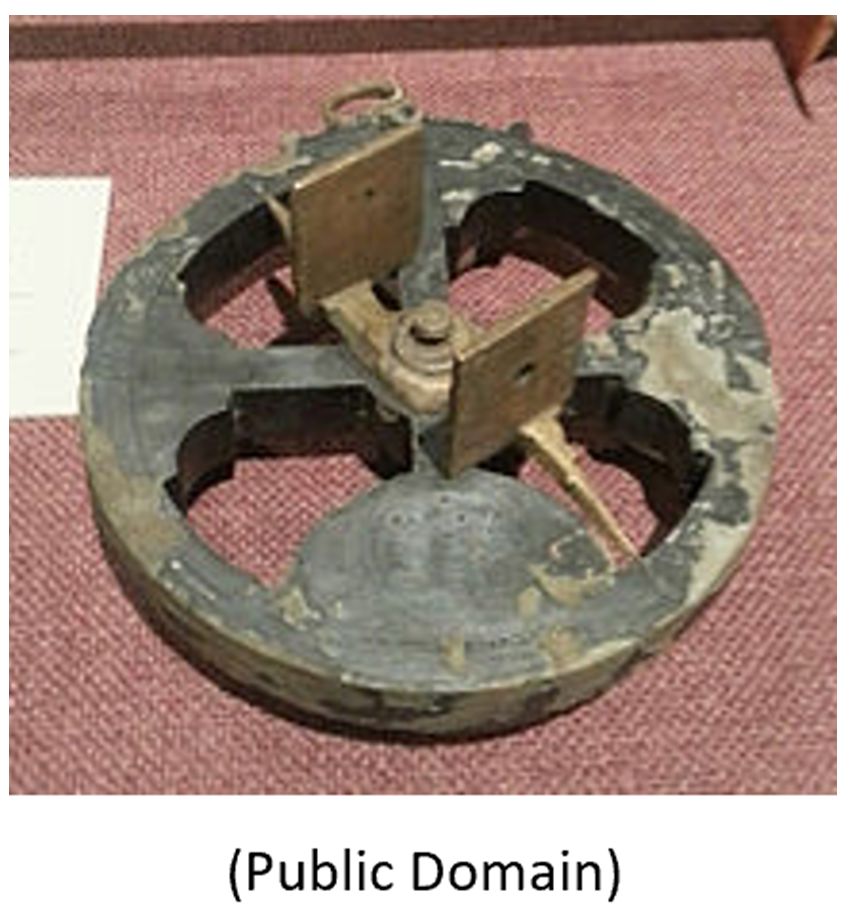
- it would be nice to measure the altitude of the Sun at noon on the above dates, but that would require looking at the Sun without eye protection, so DO NOT LOOK AT THE SUN! If you are persistent you can make a nautical or mariner’s astrolabe that can measure the Sun’s altitude without actually looking at the Sun. It has a pinhole on one end of the alidade and a projection screen on the other.
- use the astrolabe to tell time at night. Do you like a nocturnal or astrolabe better?
We’ve only scratched the surface of things an astrolabe can do. Search the internet and see if you can come up with other uses. Learn to use the astrolabe because it is going to become your partner for other activities. Note: If you do outreach take it along with you. People always want to know how high things are. You can use your astrolabe to do the actual measurement.
Using your astrolabe is a bit intimidating initially. Use the tutorial to follow step-by-step instructions.
8. Measuring – Astronomical Quadrant or Sector:
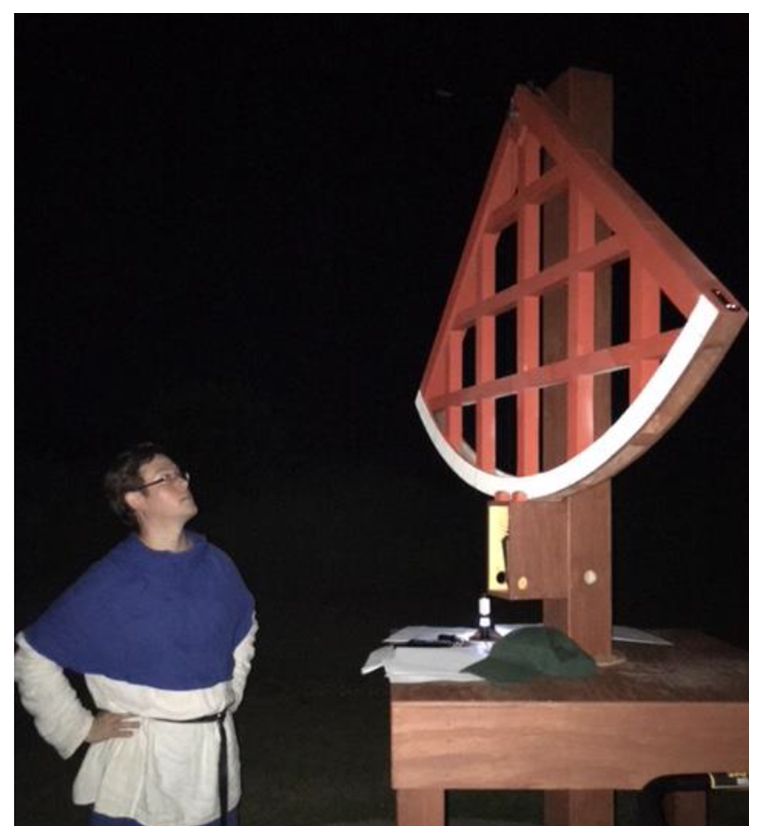
Astrolabes were designed to be hand-held and as a result had to be fairly small. The small size limited their precision. An astronomical quadrant or sector could be made much larger. Tyco Brahe was said to have had one that was said to have been 2 meters tall that supposedly allowed measurements in the sub-arcsecond range.
Some quadrants were fixed mounted on walls and as such they were usually aligned north-south. This enabled them to measure objects only as they transited the meridian. Others were able to rotate, and it was possible to read the azimuth (heading) too. The second type had to have the azimuth scale aligned to the north pole prior to use. The alignment was possibly done by the same methods you used to find north above.\
Construct an astronomical quadrant. It doesn’t have to be as large as the one in the picture but try to make it at least one foot on a side so it is significantly larger than your astrolabe. It should be noted that an astrolabe is self-leveling while a quadrant is not. Make sure to level your quadrant prior to using it.\
Practice using your quadrant by measuring the height of Polaris, the elevation of a few bright stars as they cross the meridian at night (transit), and by measuring the altitude and azimuth of the moon and planets. Record the dates and times along with your observations. Compare the use and results from your work with an astrolabe and quadrant. Do you have a preference? Does one seem easier to use? Does one give better data? It is interesting to know that Kepler used data from one of Brahe’s quadrants to get the data to verify his three laws of planetary motion.
 \
\
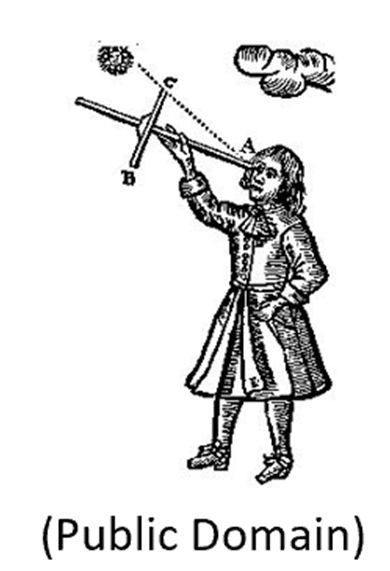
9. Measuring – Cross-staff or Jacob’s Staff:
An astrolabe or quadrant is good when measuring a single object. It is possible to measure the difference between things but it requires two readings, one for each object. A cross-staff is designed to measure two things simultaneously.
It is a bit hard to locate directions and information on a cross-staff so try your hand at the one described at:
https://pwg.gsfc.nasa.gov/stargaze/Scrostaf.htm
Try using a cross-staff to measure the angle between:
- Polaris and the horizon (your latitude),
- The length of Orion’s belt.>
You were standing on the ground when you used all three of the constructed instruments. Navigation at sea was a major concern during the time period these instruments were used. Finding the latitude was a daily chore. Imagine trying to do that on a moving sailing ship.
10. Measuring: Use your astrolabe, quadrant and cross-staff to measure (pick the tool that you think is best for the task):
- pick a star and measure how far it moves in an hour,
- how far the moon moves versus a star you choose in an hour,
- angular diameter of the moon, (is your instrument precise enough to do this?)
- the two diagonals of the Great Square, (is it really a square?)
- the azimuth of the rising full moon for three months in succession
- the altitude of the full moon one hour after it rises for three months in succession
- the angle(s) between the following:
- Betelgeuse and Rigel
- Castor and Pollex
- The three stars in the Summer Triangle
- two planets in conjunction
- Venus and the Sun monthly for ½ a cycle from when it first appears in the evening (or morning) sky until it disappears about ten months later. Plan your observation for just after the Sun sets (or before it rises in the morning). Don’t look directly at the Sun. Wait until it just dips below the horizon
Many amateur astronomers use their fists (10o), three fingers (5 o),and a pinky finger (1o) to estimate angular distances in the sky. Do you find that these earlier instruments give equal or better measures?
11. Measuring: Solstices – Solstices were very important for ancient cultures. Measure the Sun’s altitude as it crosses the meridian on the solstices using a gnomon. Particularly for the winter solstice weather may be an issue. Luckily enough the equation of time isn’t very different for a few days on either side of it you can do the measurements anytime within the week. Do you notice anything about the difference between the two elevations?
12. Measuring: Use your astrolabe and/or quadrant to measure the positions of at least thirty (30) of the navigation stars (57) visible from your location. If you live too far north you won’t be able to see all of the navigation stars. Use the astrolabe/quadrant in transit mode for at least fifteen of the stars. For these fifteen stars record the local sidereal time of the observation. For all of the stars record the data as altitude (height), azimuth (direction), date and clock time to the minute. From the alt/az data and your location calculate the right ascension and declination. You can find sidereal clock software on the Internet. You may use a compass to help measure the positions when not using the transit method. See the document “Converting Horizontal Coordinates to Equatorial Coordinates” in the Link section below.
13. Star Chart/Planisphere – (Note: polar coordinate graph paper might help): Using your data from the navigation stars create a star chart. Rather than measure, to save time look up the RA and Dec of other major stars in the zodiacal and circumpolar constellations and add them to your chart.
- Measure the distance between +90o and 0o on your graph. Cut a circle out of a second piece of paper twice that distance to give you a horizon for your Planisphere. Overlay it on top of your star chart with Polaris at the correct elevation for your site. Looking at an already assembled Planisphere can you find a combination of date and time that resembles your model?
- If you want to create a working Planisphere there is a link to a labeled star chart with five hundred stars in the Links section below.
- See this site for pictured directions for making a star chart: https://www.wikihow.com/Make-and-Use-Star-Charts
14. Location – Measure your local longitude: (Clocks weren’t accurate enough to do this during our time period but it’s easy and fun to do)
- Before the ability to find longitude sea travel involved sailing until the correct latitude was reached and then sailing east or west to the destination. It made voyages much longer and more dangerous. It wasn’t until after Harrison’s invention of the marine chronometer in 1761 that longitude determination became practical. Even then it took years for the practice to become established. It was extremely important for the clock to be set to the correct time. Ships headed down the Thames would set their clocks by watching for the time ball to drop every hour at the Greenwich Observatory. The ball still drops but primarily for the visitors at the Observatory. There is an excellent book & video called “Longitude” that details Harrison’s efforts to develop the marine chronometer.
15. Viking Sun Stone (optional activity): It is believed that the Vikings were able to navigate by locating the position of the Sun on a cloudy day and during the extended twilights of the north. They may have used a Viking Sun Stone. It would indicate East and West during twilight. A Viking Sun Stone was likely a piece of Iceland Spar also known as Optical Calcite or Calcium Carbonate. Optical Calcite has the beneficial property of being fairly clear and also is birefringent. This means that light coming into the crystal will become polarized. The light is split into two rays and will exit the crystal in two different spots. If you hold a crystal over an image or text you will see double.
Iceland Spar can be purchased on the internet at a reasonable price. Be warned though, some people have received stones that were too small or had fractures in the crystal that prevented them from achieving success. Also, be warned that the internet has some bad advice on how to use them. Here are our instructions on how to use them:
- You will be looking through the long direction across the crystal. Any axis will work, but the longer the crystal, the larger the distance of the birefringence. Ideally, a 1-inch, by 1-inch, by 2-inch would be great.
- Wrap the stone in black opaque paper leaving the two ends (in the long dimension) uncovered.
- Make a small black dot out of an opaque material and glue it to the exposed end of the crystal. This can be done using a glue-like rubber cement or silicon sealant that can be removed easily and is not permanent.
- When you look at the daytime sky through the crystal, you will see two images of the black dot. One is the actual dot, and one is the birefringence-caused image of the dot. Depending on the length of the crystal, the dots will overlap in different amounts. One dot is usually brighter than the other.
- Rotate the stone so that the two dots are horizontal (see image below).
- Do not point the stone at the sun, but scan across the sky above the horizon. When the two images are the same darkness you are directly below and are pointing in the direction of the sun. It is a subtle effect and takes some practice to see it.
- If there are no clouds, then the light from the sun is often too intense. Multiple sheets of white tissue paper will work well as simulated clouds. They should be held over the end of the stone that has the black dot.

Wrap the edges. Place dot on end Incorrect Azimuth / Correct Azimuth
Now for the test. On a cloudy day (or use the white tissue paper to simulate clouds), try to locate the sun using your Sun Stone. Try this at three times during the day: noon, mid-afternoon, and in early evening twilight after sunset. Measure the Azimuths indicated with a compass. Also, make three measurements each time and calculate an average Azimuth. Compare your Azimuth estimates with actual data from the internet or from planetarium software. How did your Sun Stone do?
16. Location – Wishful thinking (optional activity): If by some unlikely chance, a comet or nova were to become naked-eye visible while you are working on this observing program measure the position with your choice of instrument. If it is a comet, try to measure the position on multiple nights.
17. Astrolabes and Planispheres (optional activity): The retes of an astrolabe sometimes had elaborate patterns marking the positions of the stars (Google “astrolabe rete” and look at the images). Using the navigational stars you measured and their location on your Planisphere, design a rete that could be used with your astrolabe.
Submitting for Certification
To receive your certificate and/or pin, mail or email a copy of your observations to the Observing Program Coordinator. Include your name, mailing address, email address, phone number, and society affiliation. Indicate to whom the certification should be sent.
Astronomy Before the Telescope Observing Program Coordinator:Steve Boerner |
 |
Upon verification of your submission and of your active membership in the Astronomical League, your recognition (certificate, pin, etc.) will be sent to you or to the awards coordinator for your society, as you specified. Your name will also appear in an upcoming issue of the Reflector magazine and in the Astronomical League’s online database. Congratulations. Good luck with your next observing challenge.
Links:
- Astrolabe step by step tutorial: Using Your Astrolabe
- Sanford Solar Center/NASA Ancient Observatories
- Converting Altitude/Azimuth Coordinates to Equatorial Coordinates
- Mystery History: Sun Dagger (Youtube video)
- Equinox Sun Dagger on the back porch! (Youtube video showing modern sun dagger)
- Astrolabe Rete Google search
- Cross Staff Goddard Space Flight Center
- North American Sundial Society (NASS) at www.sundials.org
- Historic Prague clock
- The Astrolabe in Theory and Practice by Richard Wymarc
- Chaucer’s Astrolabe Treatise 1391 – Edited by James E. Morrison
- Tom Wujec’s “Learn to use the 13th-century astrolabe”
- How to Build a Customized Astrolabe Using a Laser Cutter by JohnW539
- Find Your Observing Program Award